Are you looking for a solution to remove cement render from brick? We've got you covered! In this comprehensive guide, we'll walk you through the steps to effectively remove cement render from brick surfaces. Whether you're dealing with a small area or an entire wall, our methods will help you achieve a clean and restored brick finish. So, let's dive in!
Removing cement render from brick can be a daunting task, especially if it's firmly adhered or covers a large area. However, with the right tools, techniques, and a little bit of patience, you can successfully tackle this project. Here's a step-by-step approach to guide you:
Before you begin the removal process, it's crucial to prioritize your safety. Put on your protective gear, including safety goggles, gloves, and a dust mask. These will shield you from any potential hazards like flying debris or harmful dust particles.
Start by assessing the thickness and condition of the cement render. This will help determine the level of difficulty and the appropriate removal method. If the render is loose or damaged, it may be easier to remove. On the other hand, firmly adhered render will require more effort and potentially different techniques.
To efficiently remove cement render from brick, gather the following tools and materials:
The manual removal method is a traditional yet effective way to remove cement render from brick. Here's how to proceed:
If the cement render is particularly stubborn or covers a larger area, you may want to employ a power drill with a masonry brush attachment. This method can speed up the removal process. Follow these steps:
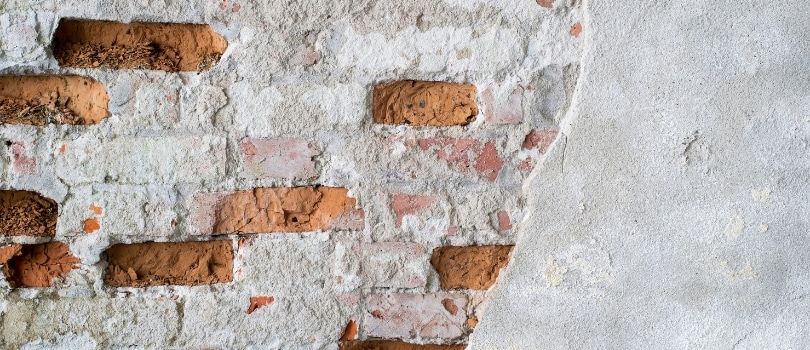
Once the cement render has been successfully removed, it's time to clean the brick surface and reveal its true beauty. Follow these steps for a pristine finish:
Congratulations! You have now successfully removed cement render from your brick surface. Take a step back and admire the renewed appearance of your bricks.
Remember, removing cement render from brick requires patience, precision, and the right tools. By following these steps and taking necessary precautions, you'll be well on your way to achieving a beautifully restored brick surface.
So, roll up your sleeves, gather your tools, and let's bring back the natural charm of your brickwork!
While there are chemical solutions available for removing render, they may not be the most effective option for brick surfaces. Chemicals can potentially damage the brick or alter its appearance. It's generally recommended to use mechanical methods, such as chiseling or power tools, followed by cleaning with water and a brush.
The time required depends on various factors, including the thickness and adherence of the render, the size of the area, and the removal method employed. It can range from a few hours for smaller sections to several days for larger areas.
When done carefully and with the right tools, the risk of damaging the underlying brick is minimized. However, there is always a slight possibility of minor chips or marks. It's important to use controlled and gentle force during the removal process.
Yes, it's possible to remove cement render from bricks as a DIY project. However, it requires proper tools, techniques, and safety precautions. If you have any doubts or feel uncomfortable, it's advisable to consult a professional for guidance or assistance.
If the cement render is deeply embedded or firmly adhered, it can be more challenging to remove. In such cases, using power tools like a drill with a masonry brush attachment can help loosen the render. You may need to exert more effort and take extra care not to damage the brick.
Cement render can typically be disposed of as construction waste. Check local regulations and guidelines for proper disposal methods in your area. Bagging it securely and arranging for proper disposal through waste management services or recycling centers is often the recommended approach.
In some cases, if the cement render is in good condition and free from contaminants, it can be reused. However, it's important to assess its quality and consult with professionals who can advise on its usability and compatibility with future projects.


